
Introduction
Scones are a timeless treat, perfect for breakfast, brunch, or an indulgent afternoon tea. With Bisquick, making scones becomes a breeze, allowing you to focus on flavor and presentation instead of complex techniques. But even with a shortcut like Bisquick, there are key tips and tricks to master for bakery-quality results.
This article dives deep into the essentials of crafting the perfect Bisquick scones. From avoiding common mistakes to improving packet mixes, you’ll find everything you need to bake with confidence. So grab your Bisquick and let’s get started!
What Are Bisquick Scones?
What is Bisquick and why is it perfect for scones?
Bisquick is a premade baking mix that combines flour, shortening, baking powder, and salt. This blend simplifies baking, letting you skip the hassle of measuring multiple ingredients. It’s ideal for scones because it creates a light, flaky texture with minimal effort.
Types of scones you can make with Bisquick
The beauty of Bisquick lies in its versatility. With just a few tweaks, you can create:
- Classic Scones: Simple, buttery, and perfect with jam.
- Savory Scones: Add cheese, herbs, or bacon for a hearty snack.
- Sweet Scones: Mix in chocolate chips, dried fruits, or nuts for a dessert-like treat.
- Glazed Scones: Drizzle with icing for an elegant finish.
Whether you’re new to scone-making or a seasoned baker looking for convenience, Bisquick scones are an excellent choice for every occasion.
Essential Ingredients for Perfect Bisquick Scones
Main ingredients and their roles
To make perfect Bisquick scones, each ingredient plays a critical role:
- Bisquick Mix: The foundation of the scones, combining flour, leavening agents, and fat for easy preparation.
- Liquid (Milk, Cream, or Buttermilk): Adds moisture and helps bind the ingredients. Each liquid creates a slightly different texture—milk for a lighter crumb, cream for richness, and buttermilk for a subtle tang.
- Butter or Margarine: Enhances the flavor and contributes to the scones’ flaky layers. Using cold butter is key for achieving the right texture.
- Sugar (Optional): Adjust the sweetness depending on whether you’re making savory or sweet scones.
Best liquids to use: milk, cream, or buttermilk?
Choosing the right liquid can take your scones to the next level:
- Milk: Perfect for classic scones, creating a light texture with subtle flavor.
- Heavy Cream: Adds a luxurious richness, making the scones more indulgent.
- Buttermilk: The acidity in buttermilk reacts with the baking powder in Bisquick, resulting in extra-tender and fluffy scones.
Optional add-ins to elevate your scones
Enhance the flavor and texture of your scones with these creative additions:
- Sweet Add-ins: Blueberries, dried cranberries, chocolate chips, or lemon zest.
- Savory Add-ins: Cheddar cheese, chives, bacon bits, or garlic powder.
- Spices and Extracts: Cinnamon, nutmeg, vanilla extract, or almond essence.
By understanding how each ingredient works, you can easily customize your Bisquick scones to suit your taste.
Step-by-Step Guide to Making Bisquick Scones
Preparing your ingredients and equipment
Before you begin, ensure you have everything ready:
- Ingredients: Bisquick mix, cold butter, your chosen liquid (milk, cream, or buttermilk), and any add-ins like fruits or cheese.
- Equipment: A large mixing bowl, pastry cutter or fork, measuring cups, baking sheet, and parchment paper.
Pro Tip: Chill your butter, mixing bowl, and any liquid ingredients beforehand. Cold ingredients are crucial for flaky scones.
Mixing and shaping the dough: Pro tips
- Combine the dry ingredients: Start by measuring the Bisquick mix into a large bowl.
- Cut in the butter: Use a pastry cutter or fork to blend cold butter into the mix until it resembles coarse crumbs. This step ensures the butter creates flaky layers during baking.
- Add the liquid: Gradually pour in your chosen liquid while gently mixing. The dough should be slightly sticky but not wet. Overmixing will result in dense scones.
- Fold in add-ins: If using fruits, nuts, or cheese, gently incorporate them into the dough without overworking it.
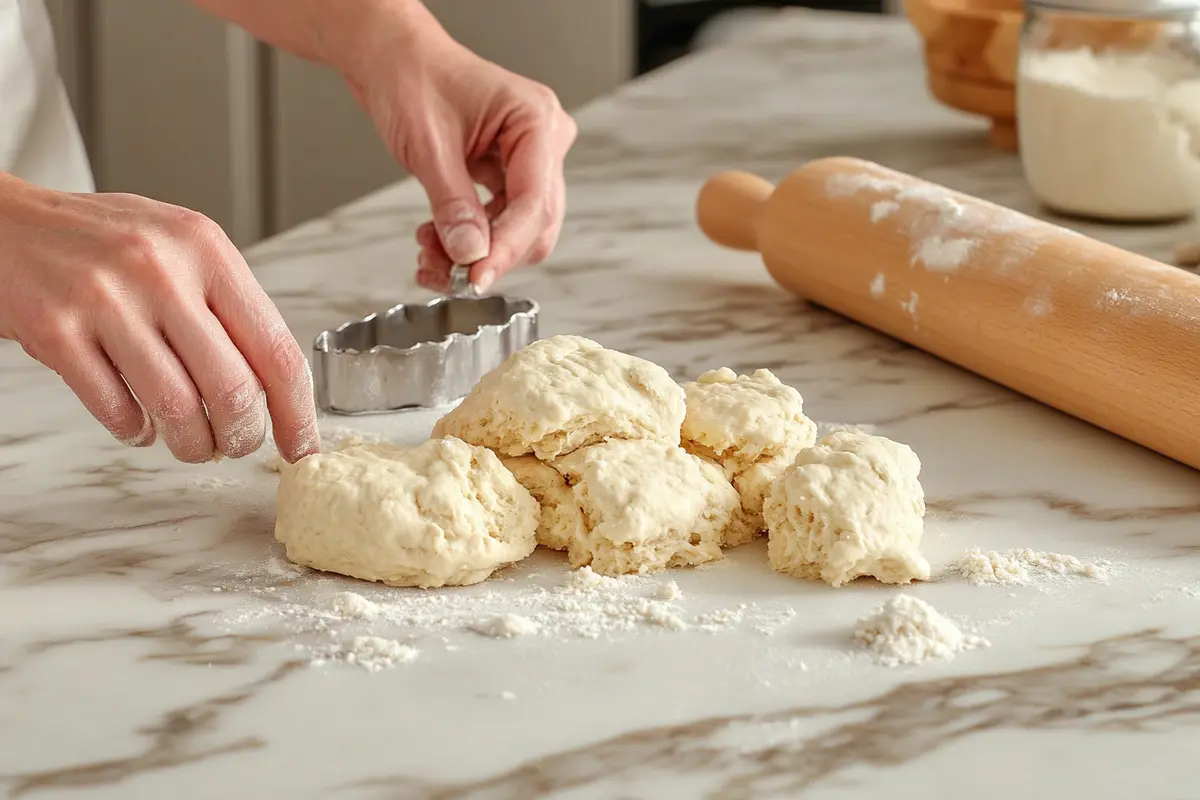
- Shape and cut the dough: Lightly flour your work surface, then pat the dough into a ¾-inch thick circle or rectangle. Use a round cutter for traditional scones or cut into triangles for a rustic look.
Baking to perfection: Temperature and timing
- Preheat your oven: Set it to 425°F (218°C) for golden-brown scones.
- Prepare the baking sheet: Line it with parchment paper or a silicone mat to prevent sticking.
- Bake the scones: Place the shaped dough on the prepared baking sheet, leaving space between each piece. Bake for 12-15 minutes, or until the tops are lightly golden.
- Cool before serving: Let the scones rest on a wire rack for a few minutes to prevent crumbling.
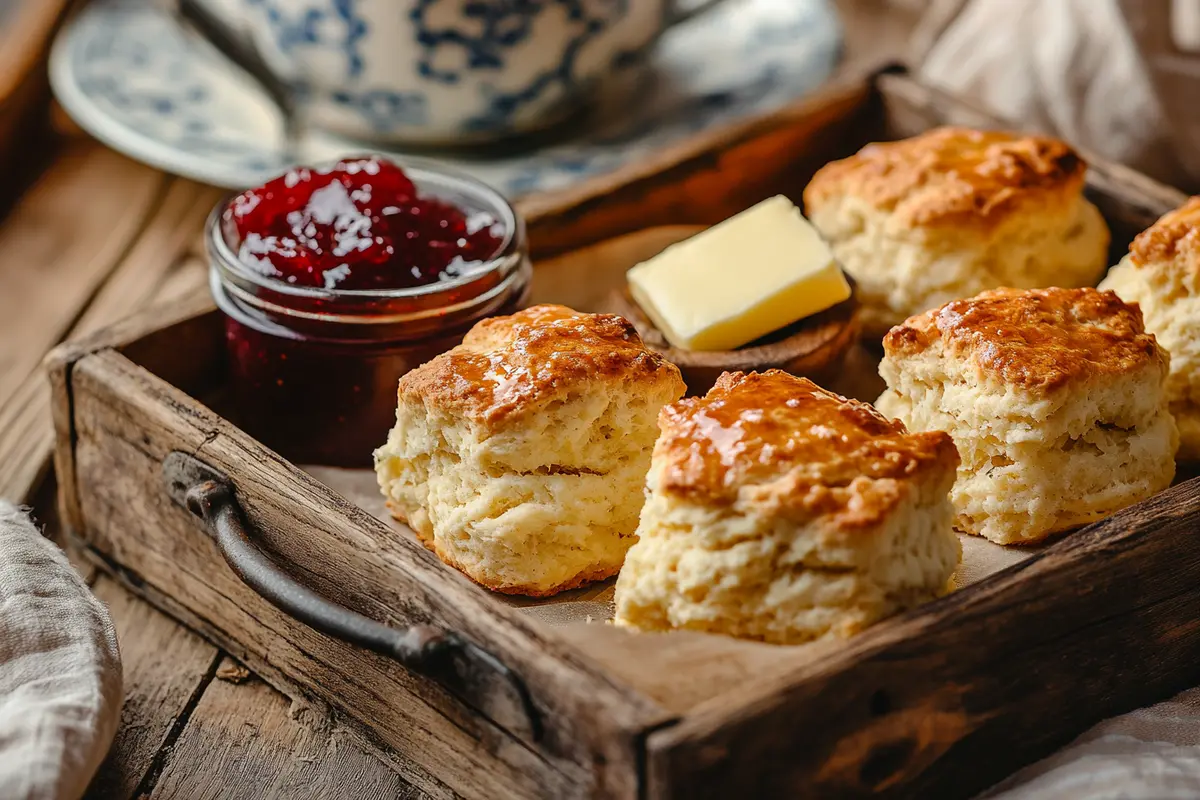
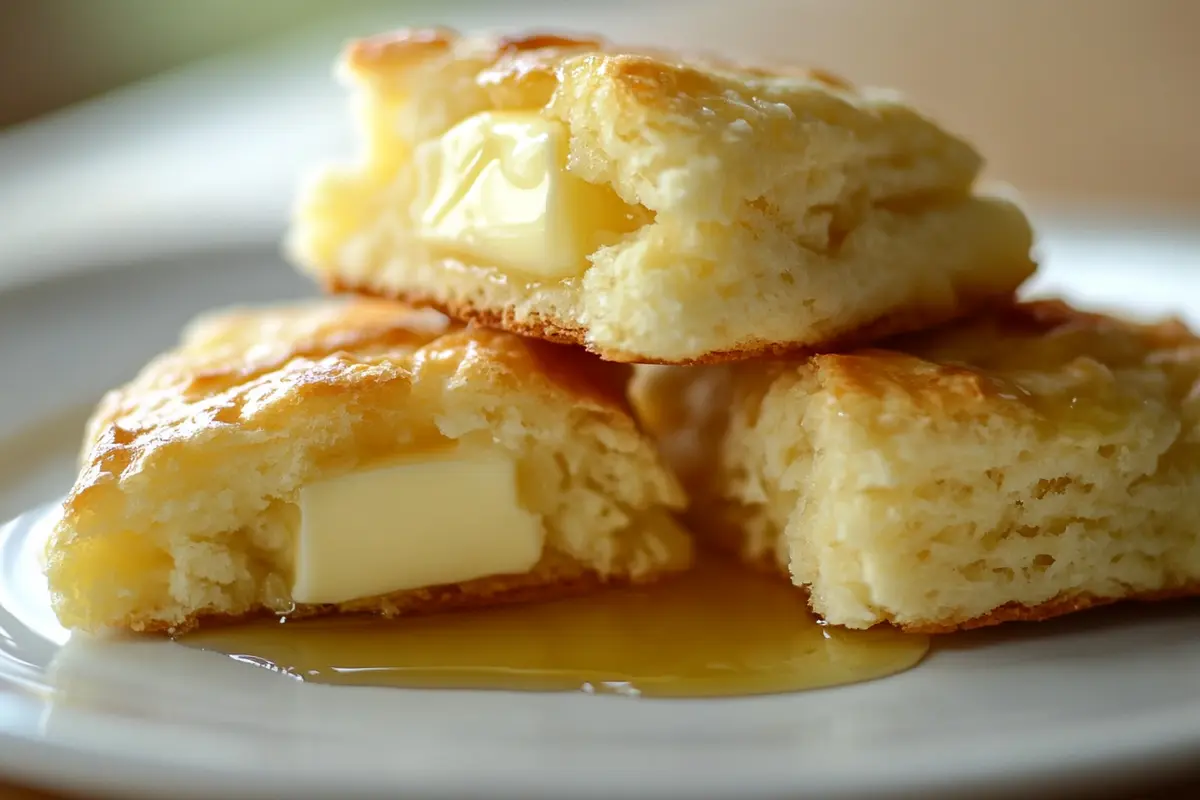
Pro Serving Tip
Enjoy your scones warm, with butter, jam, or clotted cream. For savory options, try pairing them with a drizzle of honey or a dollop of sour cream.
Common Mistakes to Avoid When Making Bisquick Scones
Even with a convenient mix like Bisquick, mistakes can happen. Avoid these common pitfalls to ensure your scones come out light, flaky, and delicious every time.
Overmixing the dough
One of the biggest mistakes when making scones is overmixing. Once you add the liquid, mix just until the dough comes together. Overmixing activates gluten in the flour, resulting in dense, tough scones instead of tender, flaky ones.
- Tip: Use a gentle folding motion and stop as soon as the dough holds together.
Skipping the chilling step
Cold ingredients are essential for flaky scones. If the butter starts to melt before baking, you’ll lose the layers that create that perfect texture.
- Tip: After shaping the dough, chill it in the fridge for 10-15 minutes before baking.
Using the wrong ratios
Scone dough needs the right balance of wet and dry ingredients. Too much liquid makes the dough sticky, while too little results in dry, crumbly scones.
- Tip: Measure your ingredients accurately and adjust slightly based on humidity or altitude.
Flattening the dough too much
Thin scones don’t rise properly and can end up overbaked.
- Tip: Aim for a dough thickness of ¾ to 1 inch before cutting.
Not preheating the oven
Scones need an immediate blast of high heat to rise and set their shape. Starting with a cold oven can make them spread too much or bake unevenly.
- Tip: Always preheat your oven to 425°F (218°C) before placing the scones inside.
Neglecting to space the scones
Crowding scones on the baking sheet prevents them from baking evenly and can cause them to merge together.
- Tip: Leave at least 1 inch of space between each scone on the baking sheet.
Using melted butter instead of cold
Warm butter won’t create the steam pockets needed for flaky layers.
- Tip: Always use chilled butter and handle it as little as possible to keep it from warming up.
By keeping these tips in mind, you’ll avoid the most common scone-making mishaps and get perfect results every time.
The Secret to Making Good Bisquick Scones
What makes some scones irresistibly good while others fall flat? It all comes down to the little details. Here are the top secrets for crafting the perfect Bisquick scones every time.
Keeping ingredients cold
The secret to flaky, tender scones lies in keeping the butter and liquid ingredients cold. When cold butter is baked, it creates steam that forms pockets in the dough, leading to light, flaky layers.
- Pro Tip: Chill your mixing bowl, pastry cutter, and even your hands if you’re working in a warm kitchen.
Gentle handling of the dough
Scone dough is delicate and should be handled as little as possible. Overworking the dough will activate the gluten, resulting in chewy, dense scones.
- Pro Tip: Use a light touch when mixing and shaping the dough. Avoid rolling it out too many times.
The art of adding flavors: Fruits, nuts, and spices
Enhancing Bisquick scones with creative add-ins can elevate them from ordinary to exceptional.
- For sweet scones, try blueberries, chocolate chips, dried cranberries, or lemon zest.
- For savory options, incorporate cheddar cheese, herbs like chives, or even crispy bacon bits.
- Add a pinch of spices like cinnamon, nutmeg, or cardamom for a unique twist.
Chilling the dough before baking
Resting the dough in the fridge for 10-15 minutes helps the butter stay solid and allows the gluten to relax, leading to better texture and shape retention.
Proper baking temperature
The high initial oven temperature ensures the scones rise quickly and bake evenly. Lowering the temperature mid-bake is unnecessary with Bisquick scones.
By mastering these secrets, you can consistently create fluffy, flavorful scones that rival those from the best bakeries.
Looking for inspiration? Try Cherry Turnover.
Creative Bisquick Scone Recipes to Try

Bisquick scones are a versatile canvas for your culinary creativity. From sweet to savory, here are some inspiring recipes that you can try at home to elevate your scone game.
Savory Cheddar and Chive Scones
Perfect as a snack or side dish, these scones are cheesy, buttery, and packed with flavor.
Ingredients:
- 2 cups Bisquick mix
- ½ cup shredded cheddar cheese
- 2 tbsp chopped fresh chives
- ⅓ cup milk or heavy cream
- 2 tbsp cold butter (cubed)
Instructions:
- Preheat your oven to 425°F (218°C).
- Combine Bisquick mix, cheese, and chives in a large bowl.
- Cut in the butter until the mixture resembles coarse crumbs.
- Add milk gradually and mix until just combined.
- Shape the dough into a circle and cut into triangles.
- Bake for 12-15 minutes or until golden brown.
Lemon Blueberry Scones with Glaze
Bright and tangy, these scones are a crowd-pleaser for breakfast or dessert.
Ingredients:
- 2 cups Bisquick mix
- ⅓ cup sugar
- Zest of 1 lemon
- ½ cup fresh or frozen blueberries
- ½ cup buttermilk
- 2 tbsp cold butter
- Glaze: 1 cup powdered sugar, 2 tbsp lemon juice
Instructions:
- Mix Bisquick, sugar, and lemon zest in a bowl.
- Cut in cold butter until crumbly.
- Gently fold in blueberries and buttermilk.
- Shape and bake as described in the base recipe.
- Once cooled, drizzle with lemon glaze.
Chocolate Chip Dessert Scones
A decadent treat perfect for chocoholics.
Ingredients:
- 2 cups Bisquick mix
- ½ cup mini chocolate chips
- 2 tbsp sugar
- ⅓ cup heavy cream
- 2 tbsp cold butter
Instructions:
- Combine Bisquick mix, sugar, and chocolate chips.
- Cut in butter until crumbly. Add heavy cream gradually and mix until just combined.
- Shape and bake as directed in the base recipe.
Pro Tip for All Recipes
Feel free to experiment with your favorite flavors! Swap blueberries for raspberries, cheddar for Gouda, or add a pinch of your favorite spice.
FAQs :
Here are some frequently asked questions about Bisquick scones to help you troubleshoot and perfect your baking process.
What are some common mistakes to avoid when making scones?
Mistakes can easily turn scones from fluffy to disappointing. Here’s how to avoid them:
- Overmixing the dough: This leads to dense, tough scones. Mix just until the ingredients come together.
- Skipping the chilling step: Cold butter is essential for flaky layers. Always chill the dough before baking.
- Incorrect oven temperature: A hot oven (425°F) ensures proper rise and texture.
- Flattening the dough too much: Aim for ¾ to 1-inch thickness to give your scones room to rise.
What is the difference between old Bisquick and new Bisquick?
The new Bisquick mix is slightly sweeter and finer in texture compared to the original formula. Modern mixes may include added sugar and emulsifiers, making recipes more consistent but slightly less rich. To replicate the old Bisquick flavor:
- Add a tablespoon of butter to enhance richness.
- Use buttermilk for a tangy, old-fashioned taste.
What is the secret to making good scones?
The secret lies in the details:
- Cold Ingredients: Butter, liquids, and even the mixing bowl should be cold to create flaky layers.
- Gentle Mixing: Handle the dough as little as possible to avoid activating gluten.
- Proper Baking Techniques: Preheat your oven and bake at a high temperature to achieve a golden, flaky texture.
- Creative Add-ins: Personalize your scones with fruits, nuts, or cheese to make them stand out.
How to improve packet scone mix?
Packet scone mix, like Bisquick, can be easily enhanced for a homemade touch:
- Add fresh or dried fruits, nuts, or chocolate chips for added texture.
- Incorporate spices or extracts, like vanilla or almond, to boost flavor.
- Adjust the liquid ratio with cream or buttermilk for a richer taste.
- Sprinkle coarse sugar, oats, or seeds on top before baking for added visual appeal.
Conclusion :
Making the Best Bisquick Scones at Home
Bisquick scones are a delightful way to enjoy a timeless baked treat without the hassle of starting from scratch. Whether you’re whipping up a quick breakfast, an indulgent dessert, or a savory snack, this versatile baking mix makes it easy to achieve delicious results.
By following the tips in this guide, you can avoid common mistakes, master the secret techniques, and customize your scones to suit any occasion. Whether you’re aiming for buttery cheddar and chive scones or sweet lemon blueberry creations, the possibilities are endless.
Don’t let the simplicity of Bisquick fool you—when handled with care and creativity, it can deliver bakery-quality scones right from your own oven. Remember to keep your ingredients cold, handle the dough gently, and experiment with add-ins to make each batch uniquely yours.
Now that you have all the tools and knowledge to perfect your Bisquick scones, it’s time to roll up your sleeves and get baking. Share your creations with friends and family or savor them with a cup of tea for a cozy treat.
If you’re looking for more inspiration, be sure to check out our other Bisquick recipes and baking guides to keep the delicious ideas flowing. Happy baking!